Would you like to react to this message? Create an account in a few clicks or log in to continue.
The CAN-AM RC Tank Club is a group of remote control tank enthusiasts that meet together to run our tanks on a miniature battlefield and conduct simulated battles using Infrared combat systems.
Posts : 2527 Join date : 2016-06-01 Age : 51 Location : Kitchener, ON
Subject: Updating the Sherman Sun May 31, 2020 5:11 pm
SO everyone knows about the issues I had with my KV-1 and the TK-40S, so it went under the knife again for "upgrades" and now I am awaiting some soft silicone 18ga wire for making flexible battery connections. So I decided to rebuild the Sherman! (My only Sherman, once belonging to Kyle).
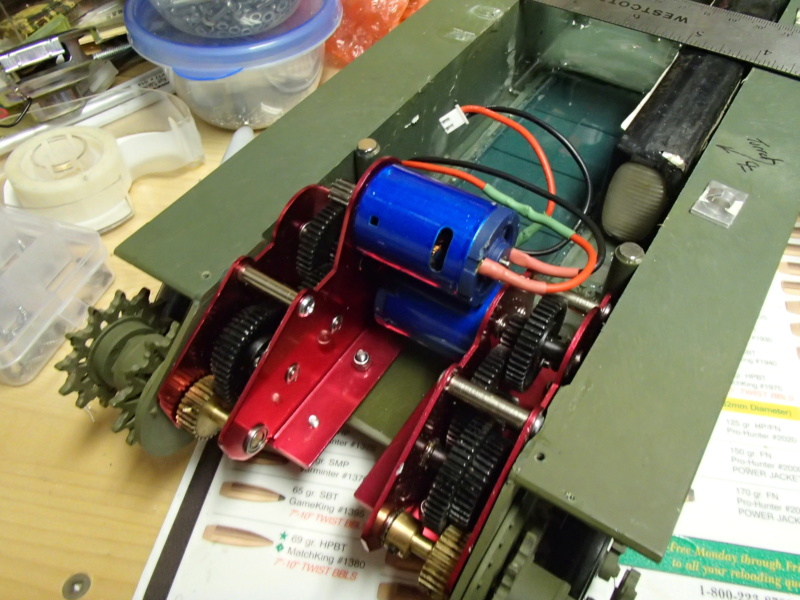
The magnetic mounts and basic gutting was already in place. But I removed the plexiglass plate installed as well as the copious amounts of silicone sealant holding the plate in.
First thing, my good buddy Dean installed a set of Mato adjustable idlers onto the hull. Thanks Dean. Next Sherman, I'll do it. (Cause If this works as nice as I hope, I'll likely end up with 3 of them...)
Keeping the HL Blue's in the tank. Being mainly a plastic tank means it will be light and I want to see this thing run
The cleaned up and epoxied chassis hull. Took 4oz of mixed epoxy to fill the entire lower hull. (Under the motors as well.) N.B.: Make sure to plug all the small holes or use thick epoxy mixture. I had about 1/2 oz leak out through the front holes by the bogeys. What a PITA to clean.
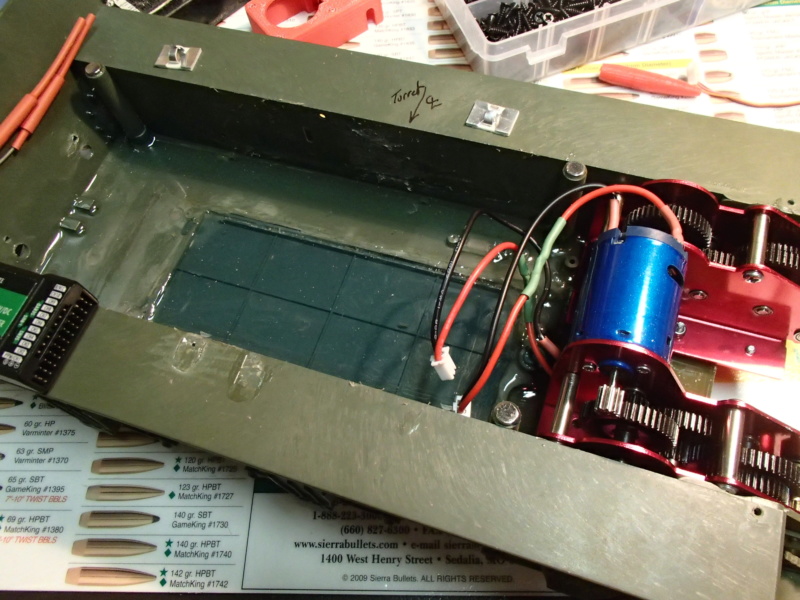
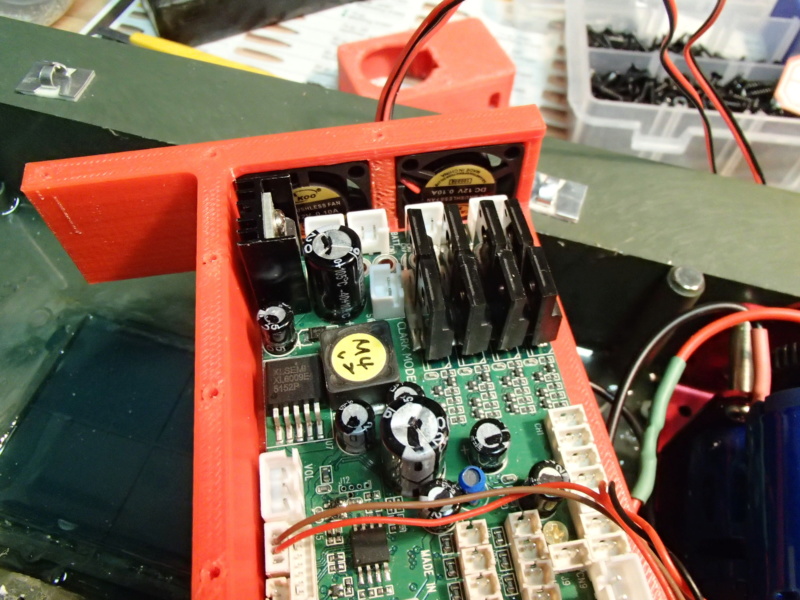
3D printed TK60 tray with risers and fan cut outs (Offset space for battery.)
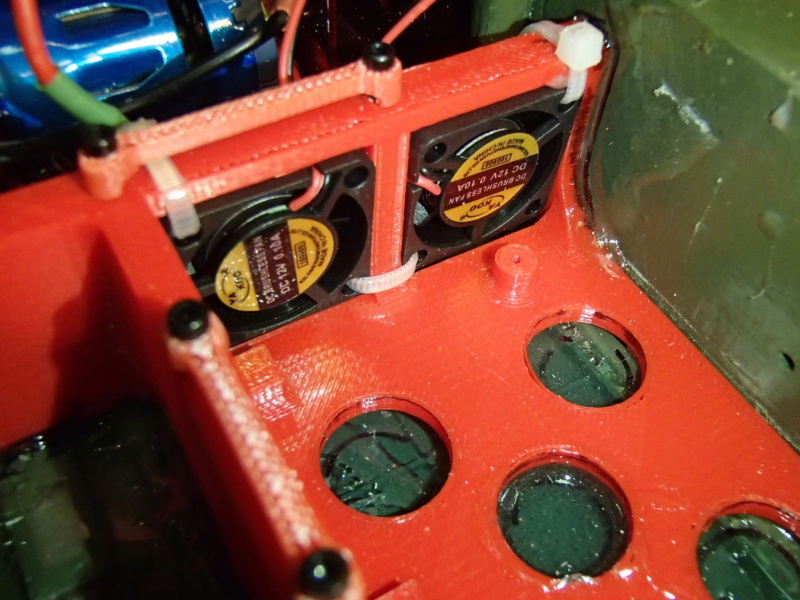
Twin cooling fans (will be replaced with 6V versions for higher air flow). One for the FETs, the other for the audio amplifier heat sink. To be powered when the entire vehicle is powered up.
Showing the position of the fans related to the TK-60 board.
First Print is a Perfect fit... Debating if I want to make the tray into a removable piece (Velcro base/screw down, or permanently mounted... If permanent, I'll need to find a different fan mount system for replacements.
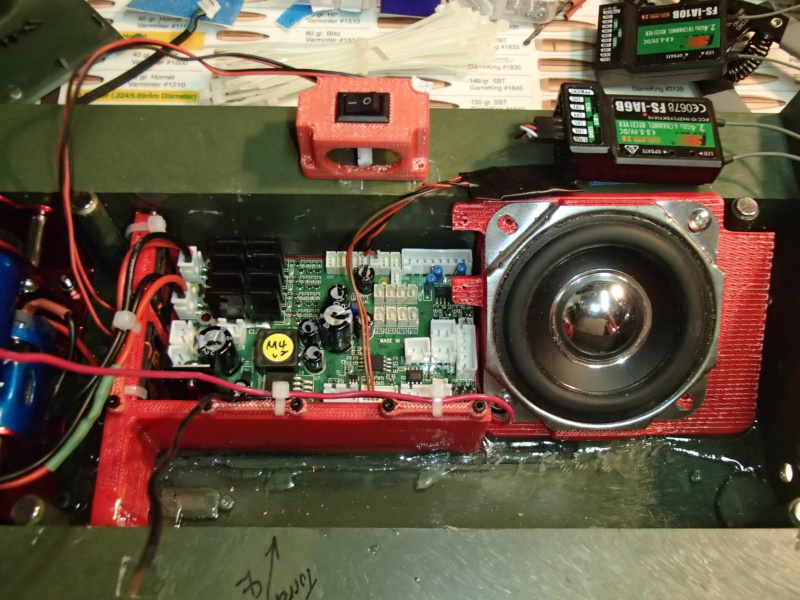
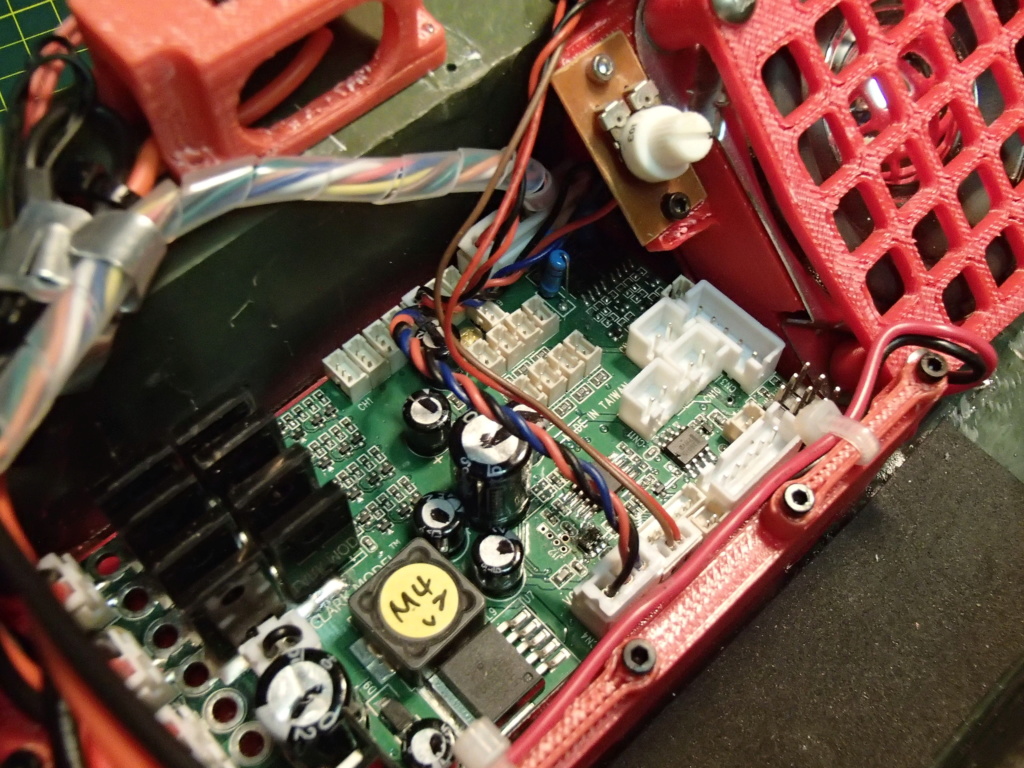
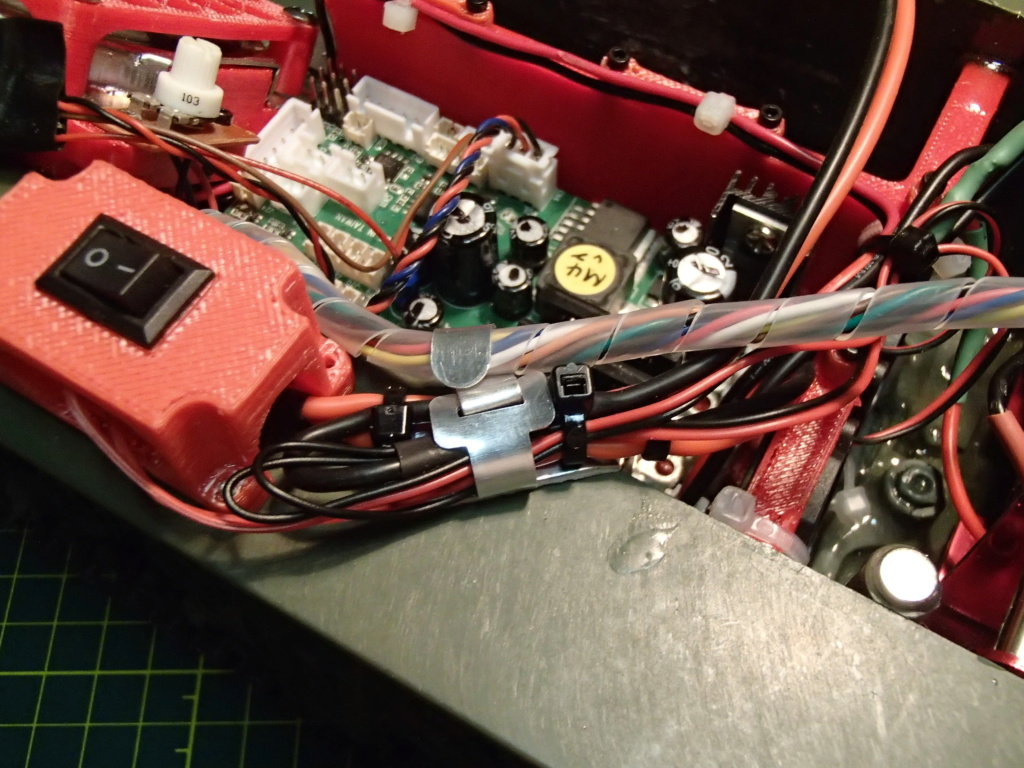
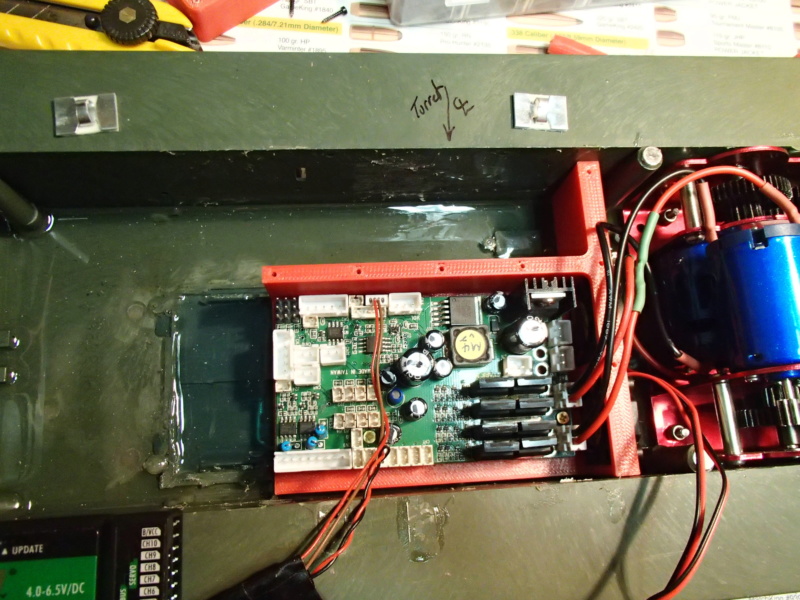
Showing the proposed location of the main power switch and the receiver (right side sponson).
The dilemma... Try out the Twin 5W speakers and add in a volume control potentiometer
OR
Squeeze in the 15W Speaker and run it at 10 all the time! Volume control is for sissies!
Showing Battery placement when final assembly will be finished.
Battery and all lower hull wiring will be for the most part even with the base of the hull sponsons.
dgsselkirk Field Marshal
Posts : 3389 Join date : 2013-02-12 Age : 64 Location : Kitchener ON
Subject: Re: Updating the Sherman Mon Jun 01, 2020 9:12 am
Very Nice! I have a bunch for you to correct my spaghetti wiring... :-)
_____________________________________________ "There are things in Russia which are not as they seem..." Georgy Konstantinovich Zhukov
Too many tanks, not enough time....
Shoveler74 Second Lieutenant
Posts : 605 Join date : 2017-03-23 Age : 50 Location : Prineville, Oregon
Subject: Re: Updating the Sherman Mon Jun 01, 2020 2:33 pm
I really should introduce you to some glass. Not sure just resin is going to add strength. Steel plate even better! Very nice work overall!
_____________________________________________ [b]You may be a king or a little street sweeper, but sooner or later you dance with the reaper! - Death[/b]
Jarlath Field Marshal
Posts : 2527 Join date : 2016-06-01 Age : 51 Location : Kitchener, ON
Subject: Re: Updating the Sherman Mon Jun 01, 2020 3:49 pm
Shoveler74 wrote:
I really should introduce you to some glass. Not sure just resin is going to add strength. Steel plate even better! Very nice work overall!
I'm still likely to put in an aluminum cross beam to remove hull flex. I redesigned the tray to add service to the fans, and it will be epoxied in place and also add some rigidity.
Strato50 General
Posts : 2188 Join date : 2012-03-28 Age : 39 Location : Hamilton, On
Subject: Re: Updating the Sherman Sun Jun 07, 2020 3:51 pm
That's so tidy and I love that tray. Makes me want something similar for my Panzers.
_____________________________________________ Tiger I - Panzer II - Panzer III - Panzer IV - Chi Nu Kai - Panther G - KV-1b 756(r) M4A3(76) Sherman - T-34/85 - M3 Grant - SECRET PROJECT
Jarlath Field Marshal
Posts : 2527 Join date : 2016-06-01 Age : 51 Location : Kitchener, ON
Subject: Re: Updating the Sherman Sun Jun 07, 2020 11:10 pm
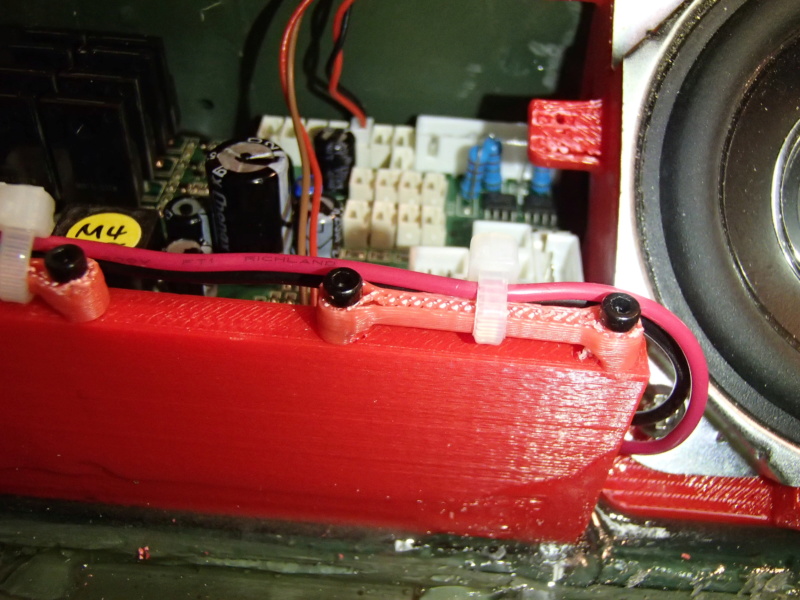
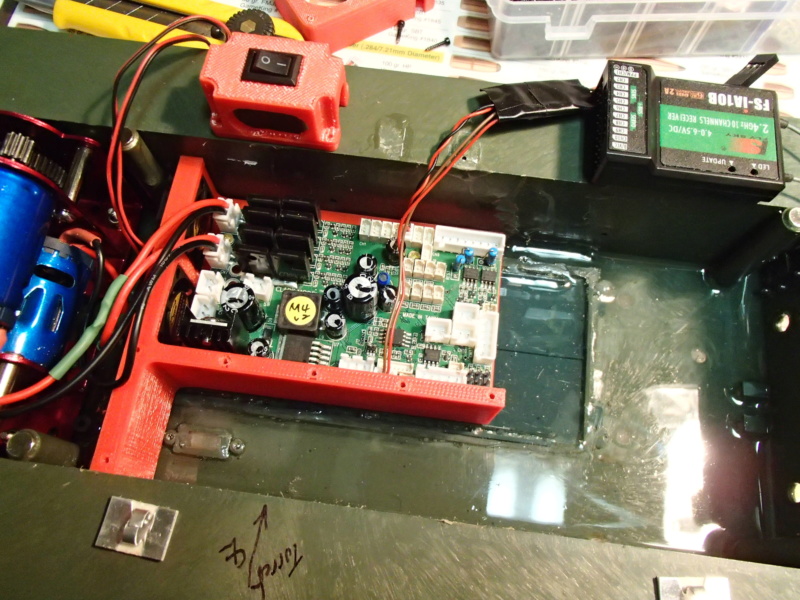
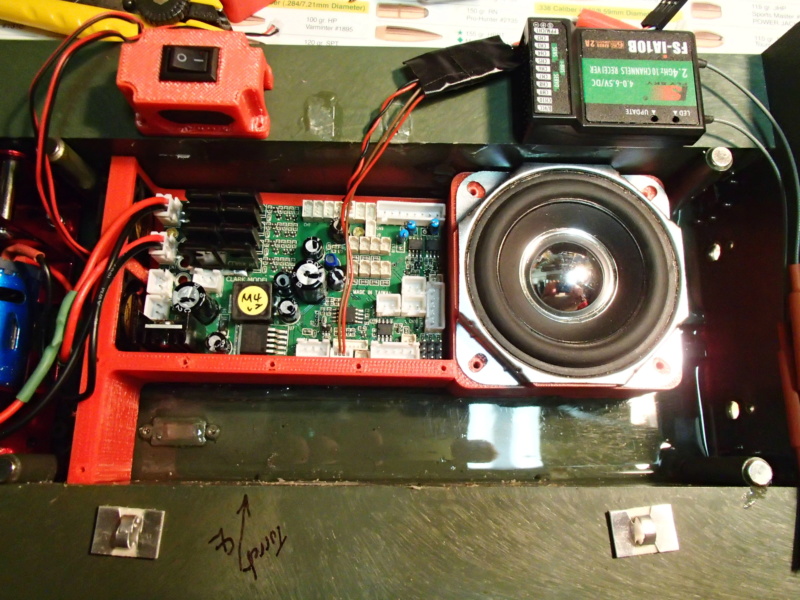
A pair of small M2 screws to hold the power switch frame into place. Had to remove a bogie to install.
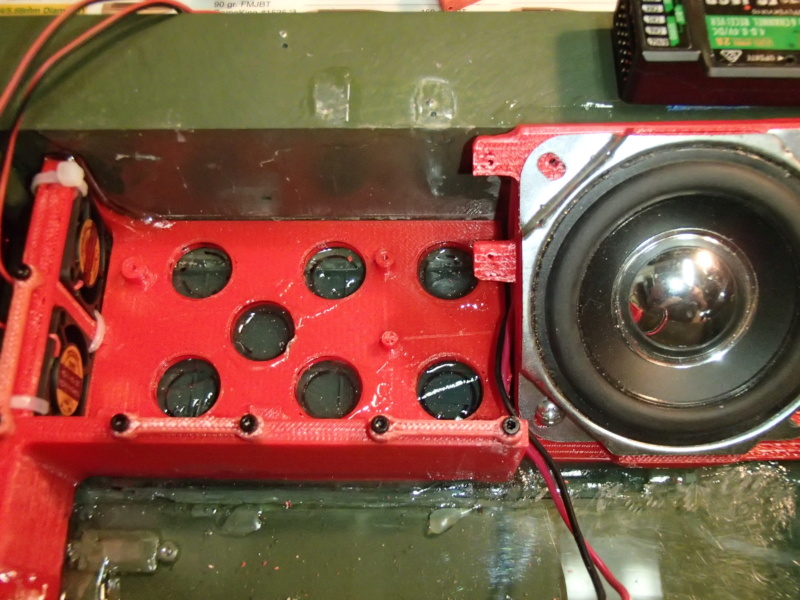
2nd gen fan/TK-60/Battery compartment tray epoxied into place. As well as the new angled speaker box.
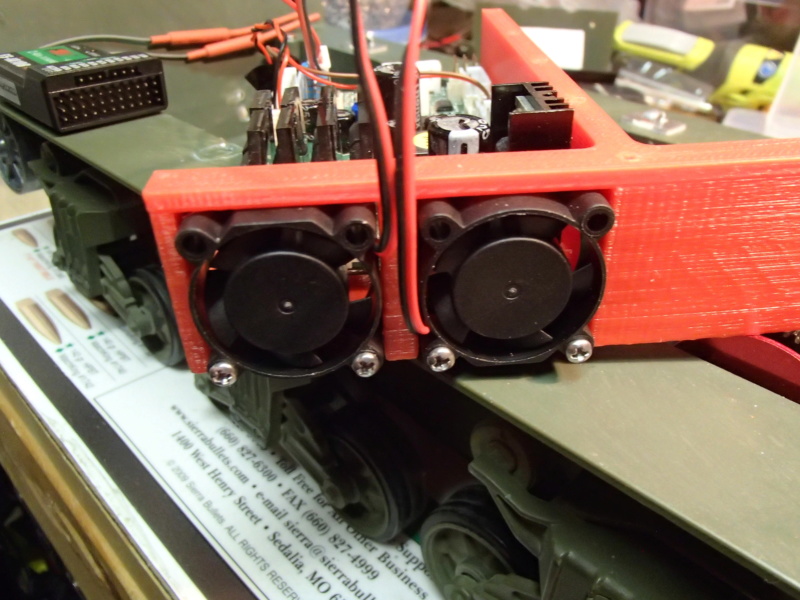
Fans in place on new tray. New retaining method. Zip ties. Those will allow for replacements if a fan fails. Yes those are bolt on tie-down bars that are screwed into the tray itself. Will allow for very clean routing in the lower hull.
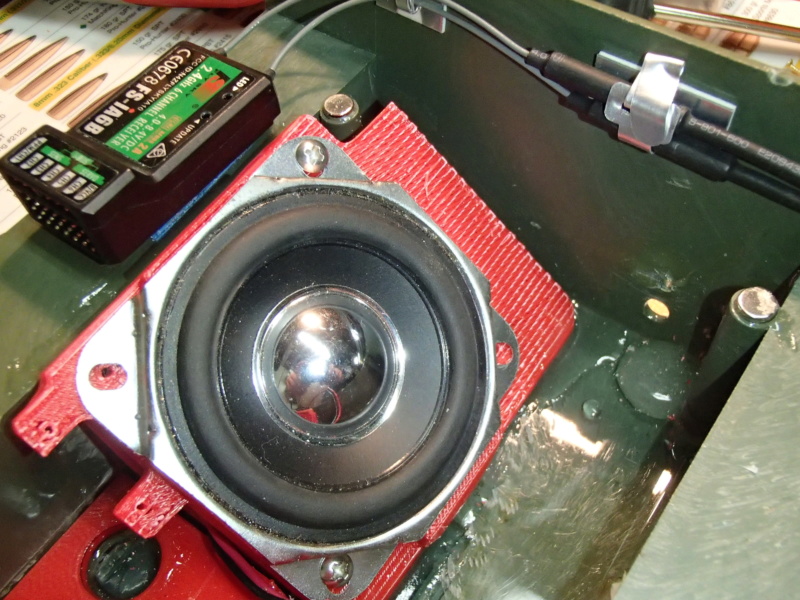
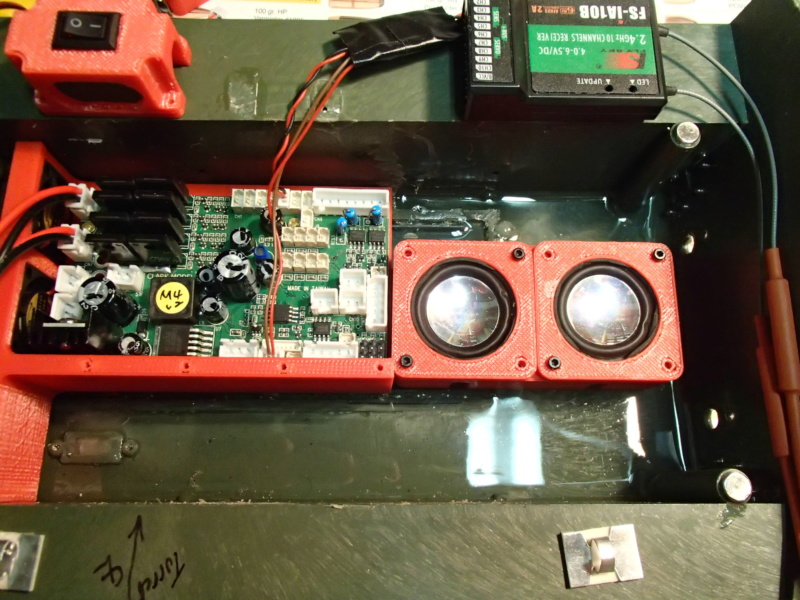
Angled 63mm 15W speaker box with a mounting point for a standard potentiometer volume control. Only 2 screws in place so far as the other two will secure a speaker grill guard (maybe use all four...)
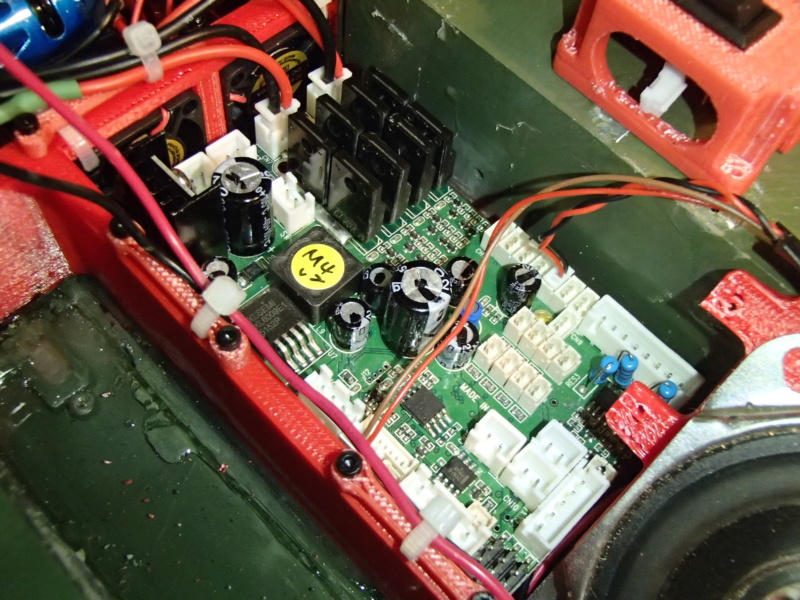
TK-60 board installed. Drive motor connections installed.
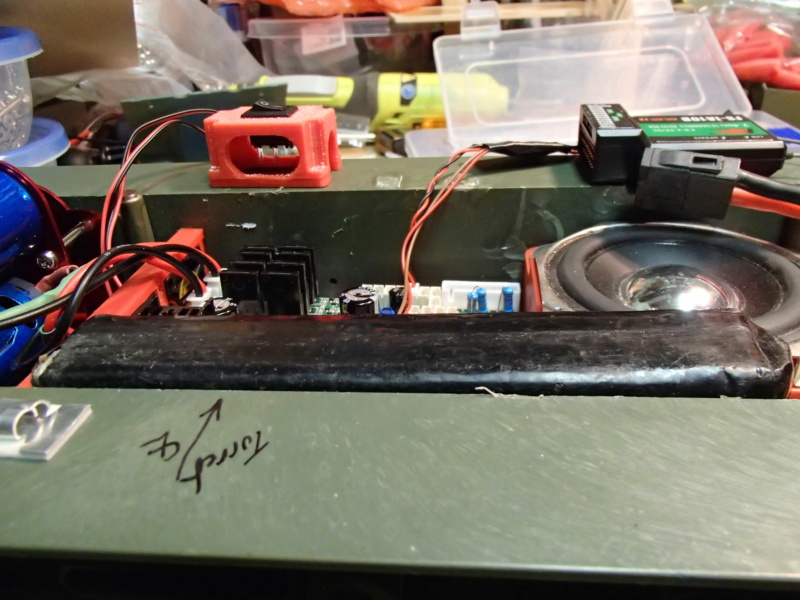
A close up of the speaker wire routing. Using the bars to ensure clean routing. Bars were added to the design to keep the tray print simpler. Plus can be used to mount other items.
The twin fans with the TK-60 board. One will blow across the FET's, while the other blows on the Sound Amp heat sink. There is also a gap of 3-4mm below the board to allow air to flow across it as well which the fans are positioned to do.
Showing the basic overall layout with the power switch frame installed. Need to still finish speaker connection to TK-60. Install the volume control. Complete the power circuit with fan tie-in (waiting for silicone sheathed wire).
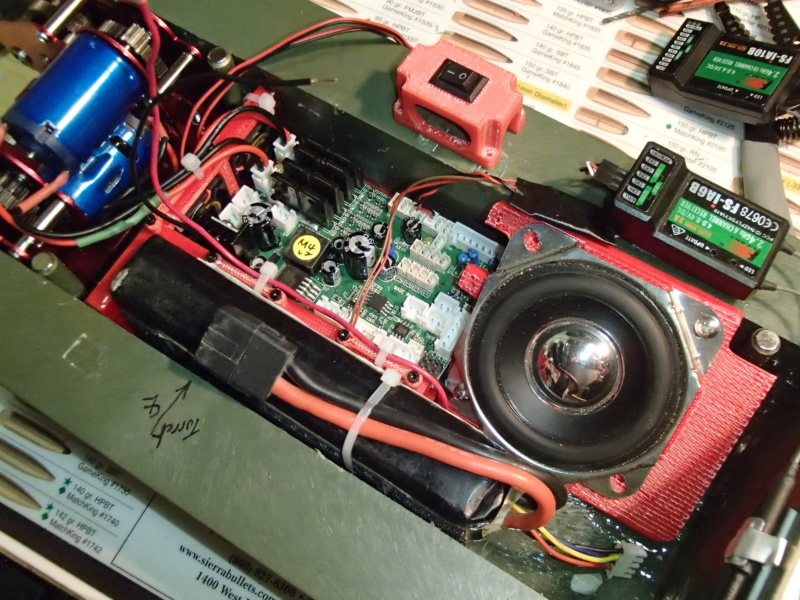
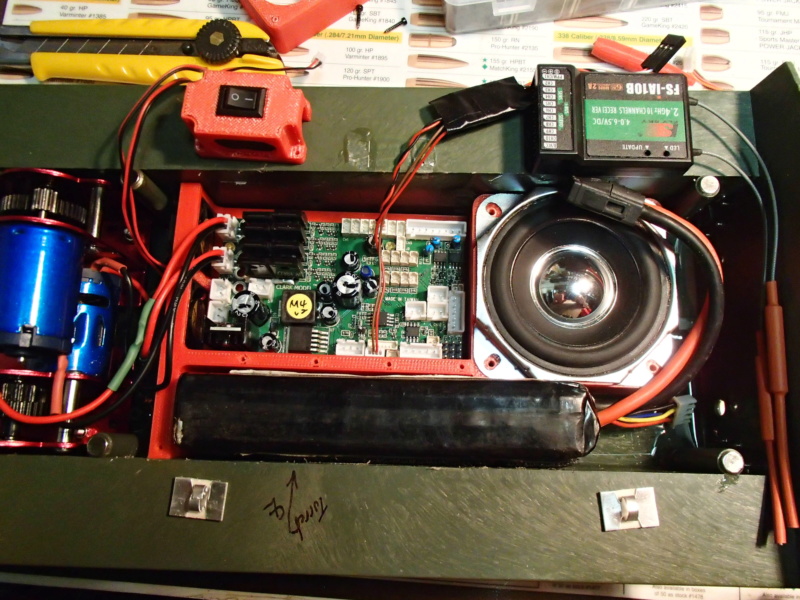
Deciding which way I'll have batteries mounted. Cable across speaker...
Leaning to this way with power cable across the front.
Jarlath Field Marshal
Posts : 2527 Join date : 2016-06-01 Age : 51 Location : Kitchener, ON
Subject: Re: Updating the Sherman Sun Jun 07, 2020 11:16 pm
I need to look for a smaller decent 15-20W speaker.... I have a pair coming to test out for space claiming. Right now the space is so tight that there is no space for a smoker.
If I can get a decent TK-40/60 setup w/ a speaker and maybe a space for a smoker, I might just make a kit for them.
Also going to look into a power switch location that will allow for access under the front driver/MG gunner hatches (which of course removes the two front assembly posts and will require some alterations to have a magnetic/alternate body securing system.)
Shoveler74 Second Lieutenant
Posts : 605 Join date : 2017-03-23 Age : 50 Location : Prineville, Oregon
Subject: Re: Updating the Sherman Mon Jun 08, 2020 5:23 am
Wow. Very cool!
_____________________________________________ [b]You may be a king or a little street sweeper, but sooner or later you dance with the reaper! - Death[/b]
Jarlath Field Marshal
Posts : 2527 Join date : 2016-06-01 Age : 51 Location : Kitchener, ON
Subject: Re: Updating the Sherman Mon Jun 22, 2020 7:20 pm
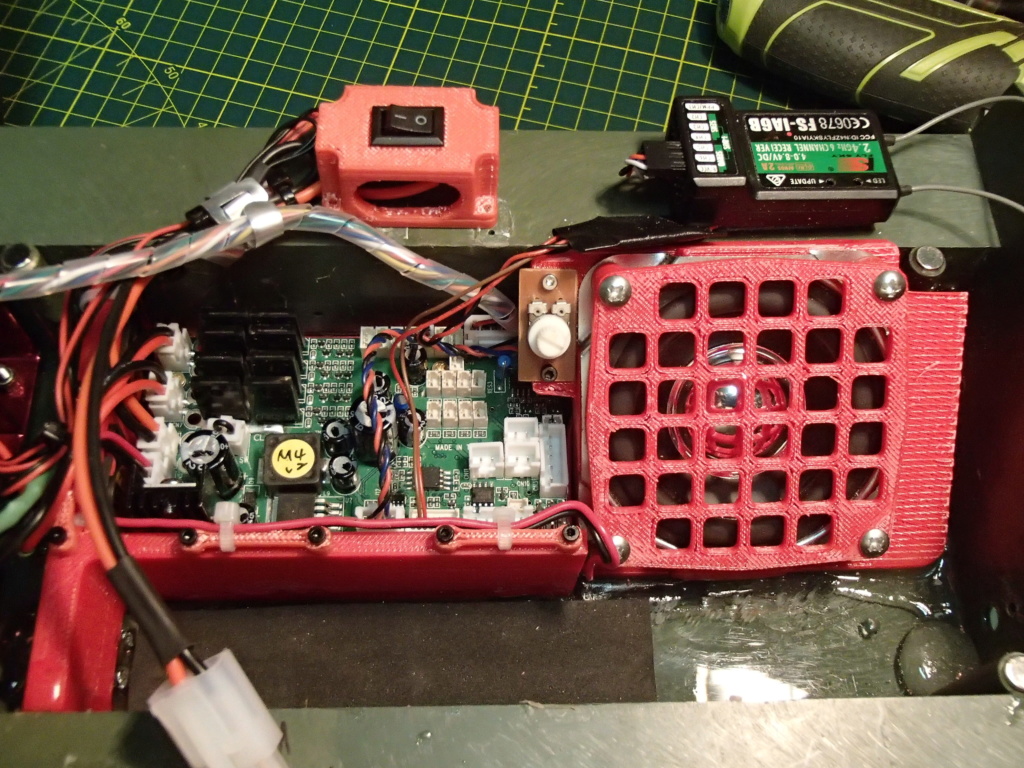
OK. Finally got my soft silicone 18 AWG wire in to complete the power cables (Battery & Switch) And of course I spent the last battleday doing surgery. Which is not unexpected, and was a nice change from the hustle and bustle & home.
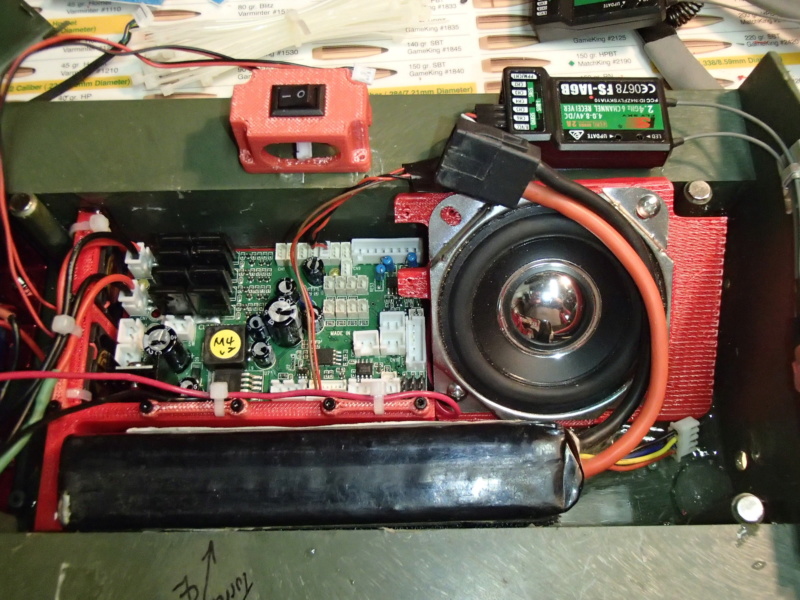
Speaker Cover installed. Volume control installed. Power jumper created and installed.
Since this unit does not have a smoker, nor Flash LED/HID.
The tightly restrained wiring for the fans and the power leads. Soldered the fan +ves together and then to the main power switch. -ves were spliced into the main negative cable. Power switches on, fans turn. No receiver brown outs, etc...
Now t program the Clark board (Recoil direction, removal of track recoil, etc....)
knispel Retired
Posts : 1318 Join date : 2012-07-01 Age : 72 Location : North of Kitchener
Subject: Re: Updating the Sherman Tue Jun 23, 2020 10:03 am
Mike, looking good, you have that Sherman packed pretty tight. Lots of fancy 3D printing helps.
Jarlath Field Marshal
Posts : 2527 Join date : 2016-06-01 Age : 51 Location : Kitchener, ON
Subject: Re: Updating the Sherman Tue Jun 23, 2020 10:15 am
Thanks!
Wondering if the distortion at the upper volume end is due to signal clipping (AMP clips output signals due to lack of V.) or at the upper limit of wattage of the speaker... These are supposedly 15W nominal speakers.
Shoveler74 Second Lieutenant
Posts : 605 Join date : 2017-03-23 Age : 50 Location : Prineville, Oregon
Subject: Re: Updating the Sherman Tue Jun 23, 2020 3:49 pm
Looking very nice indeed! Is the sound driven from the board? I haven't used them but I know there are small amplifiers out there. Cool thing to check with an oscilloscope. If you got one.
_____________________________________________ [b]You may be a king or a little street sweeper, but sooner or later you dance with the reaper! - Death[/b]
Jarlath Field Marshal
Posts : 2527 Join date : 2016-06-01 Age : 51 Location : Kitchener, ON
Subject: Re: Updating the Sherman Tue Jun 23, 2020 5:24 pm
Shoveler74 wrote:
Looking very nice indeed! Is the sound driven from the board? I haven't used them but I know there are small amplifiers out there. Cool thing to check with an oscilloscope. If you got one.
Yes. That is purely from the board (TK-60) which is supposedly is 15W max output and runs at 7-12V. My guess is that it can get to that level if connected to a 3S battery so using a 2S means it cannot achieve full output and clips the signal.
No Oscilloscope but that is OK. 3/4 volume is still super loud...


 Very nice work overall!