Would you like to react to this message? Create an account in a few clicks or log in to continue.
The CAN-AM RC Tank Club is a group of remote control tank enthusiasts that meet together to run our tanks on a miniature battlefield and conduct simulated battles using Infrared combat systems.
YAY YAY YAY open it up and keep clicking those pictures PLEASE Keep it coming because if this is a good builder and a solid runner I will be buying one too
Airbrushler Retired
Posts : 2567 Join date : 2012-04-27 Age : 60 Location : Windsor, ON
I saw the Promax motors and asiatam low-profiles gears and thought NOOOOO they won't fit!...
...but they're stubby! Nice. Did you go with a Sherman clark?
_____________________________________________ Tiger I - Panzer II - Panzer III - Panzer IV - Chi Nu Kai - Panther G - KV-1b 756(r) M4A3(76) Sherman - T-34/85 - M3 Grant - SECRET PROJECT
Adman Lance Corporal
Posts : 122 Join date : 2013-01-08 Location : Brantford
I thought I'd try to fit the motors but I bought them for Tiki anyway. :-)
Yup, it's the Sherman TK22. I thought it would be best for engine sounds, but nothing is really close to the actual sounds of the tank.
First step is finding a good glue/ plastic weld to start putting it together :-)
Yea, I think it's a safe bet. The gun will be close 'enough'
I'd love to see a real Cromwell running up close in person, that V12 meteor (merlin basically) engine is perfect...
Panzer 3/4 tracks are nearly perfect for the Cromwell, they are almost identical too. It just looks like they go on backwards!
_____________________________________________ Tiger I - Panzer II - Panzer III - Panzer IV - Chi Nu Kai - Panther G - KV-1b 756(r) M4A3(76) Sherman - T-34/85 - M3 Grant - SECRET PROJECT
White Tiger Staff Sergeant
Posts : 342 Join date : 2013-04-04 Age : 35 Location : Burnaby,BC
Subject: Re: Adman's Cromwell build Fri May 31, 2013 12:33 am
I thought I'd try to fit the motors but I bought them for Tiki anyway. :-)
Yup, it's the Sherman TK22. I thought it would be best for engine sounds, but nothing is really close to the actual sounds of the tank.
First step is finding a good glue/ plastic weld to start putting it together :-)
Yea, I think it's a safe bet. The gun will be close 'enough'
I'd love to see a real Cromwell running up close in person, that V12 meteor (merlin basically) engine is perfect...
Panzer 3/4 tracks are nearly perfect for the Cromwell, they are almost identical too. It just looks like they go on backwards!
That sound is sexy..........
_____________________________________________
Stince General
Posts : 2371 Join date : 2012-03-21 Age : 49 Location : Windsor, Ontario
Subject: Re: Adman's Cromwell build Fri May 31, 2013 7:43 am
Ya! The Britsh are coming!
The kit looks nice, but I didn't see a turret ring. Are you going to use a Heng Long one and motor?
_____________________________________________ HL Panzer III | HL Tiger | HL Jagdpanther | HL Panther | Mato Sherman Hooben Elefant | HL Pershing | HL Bergepanzer IV | Tamiya Leopard 1A | WSN T-34 HL "Golden" Pan-Tiger | M16 Halftrack | HL Panzer IV | Tamiya KV-1 | Tamiya Tiger
Adman Lance Corporal
Posts : 122 Join date : 2013-01-08 Location : Brantford
Subject: Re: Adman's Cromwell build Fri May 31, 2013 8:52 am
Yup. Christian designed it to use a heng long turret ring. I'll use servos for the elevation and recoil.
Adman Lance Corporal
Posts : 122 Join date : 2013-01-08 Location : Brantford
Subject: Re: Adman's Cromwell build Sat Jun 08, 2013 5:53 pm
I've been busy building away. The kit is really nice, but it isn't all inclusive, so I'm going to have to track down some small screws and other hardware to complete the suspension. I'm also planning to get lots of detail parts like rivets, hatch handles, small bolts and hinges.
Here's where I'm at:
These are the sides of the lower hull. They will have to wait until I figure out the suspension.
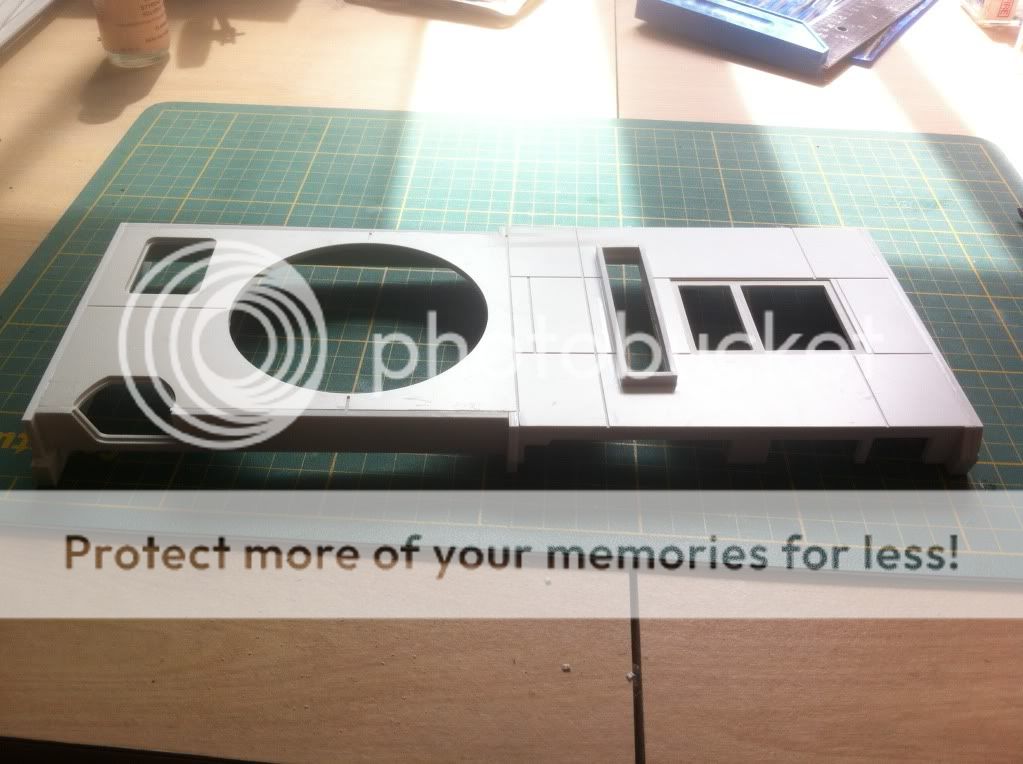
This is the upper hull. The basic structure is complete.
This is the underside of the upper hull.
This is the front of the lower hull. I still have to add the hatches and machine gun port.
Here are the wheels. Rubber still needs to go on.
Here's the drive wheel. Man those bolts took a while lol.
That's it for now. I'll be working on the turret next. I think this project will take a long time :-)
Strato50 General
Posts : 2188 Join date : 2012-03-28 Age : 38 Location : Hamilton, On
Subject: Re: Adman's Cromwell build Sat Jun 08, 2013 7:48 pm
It should take a long time, it's a very accurate kit.
It looks like they took apart a full scale tank and copied it exactly. I like the internal details.
_____________________________________________ Tiger I - Panzer II - Panzer III - Panzer IV - Chi Nu Kai - Panther G - KV-1b 756(r) M4A3(76) Sherman - T-34/85 - M3 Grant - SECRET PROJECT
Freakydude Sgt-Major
Posts : 454 Join date : 2012-11-25 Location : Barrie
Subject: Re: Adman's Cromwell build Sat Jun 08, 2013 8:46 pm
putting those bolts into each drive wheel is nice very very nice until of course you have to tighten them down. Great time to invest in quality thread locker. Keeps the pics coming adman, this is stellar so far
Adman Lance Corporal
Posts : 122 Join date : 2013-01-08 Location : Brantford
Subject: Re: Adman's Cromwell build Sat Jun 29, 2013 4:00 pm
Finally found some time to start building the turret :-) ill need to figure out some sort of magnet solution for the securing the top.
Airbrushler Retired
Posts : 2567 Join date : 2012-04-27 Age : 60 Location : Windsor, ON
Subject: Re: Adman's Cromwell build Sat Jun 29, 2013 6:07 pm
look like everything fits really nice this is going to be a great build keep the pics coming and thanks for sharing
_____________________________________________
Stince General
Posts : 2371 Join date : 2012-03-21 Age : 49 Location : Windsor, Ontario
Subject: Re: Adman's Cromwell build Sat Jun 29, 2013 9:28 pm
_____________________________________________ HL Panzer III | HL Tiger | HL Jagdpanther | HL Panther | Mato Sherman Hooben Elefant | HL Pershing | HL Bergepanzer IV | Tamiya Leopard 1A | WSN T-34 HL "Golden" Pan-Tiger | M16 Halftrack | HL Panzer IV | Tamiya KV-1 | Tamiya Tiger
Adman Lance Corporal
Posts : 122 Join date : 2013-01-08 Location : Brantford
Subject: Re: Adman's Cromwell build Sun Jun 30, 2013 10:05 am
I think I can too. Thanks for the link!
I still have to get most of the hardware to detail and finish putting some parts together.
Strato50 General
Posts : 2188 Join date : 2012-03-28 Age : 38 Location : Hamilton, On
Subject: Re: Adman's Cromwell build Sun Jun 30, 2013 11:05 am
Do you have a local source of rare earth magnets? Half my tanks' weight is made up of those things.. they work wonders.
Do you just need to secure hatches and stuff?
_____________________________________________ Tiger I - Panzer II - Panzer III - Panzer IV - Chi Nu Kai - Panther G - KV-1b 756(r) M4A3(76) Sherman - T-34/85 - M3 Grant - SECRET PROJECT
Adman Lance Corporal
Posts : 122 Join date : 2013-01-08 Location : Brantford
Subject: Re: Adman's Cromwell build Sun Jun 30, 2013 11:56 am
Hatches, suspension, gun mounting, rivets... I need hardware for all of that stuff. My hobby shop does have a supply of tiny rare earth magnets that ill probably pick up soon.
Adman Lance Corporal
Posts : 122 Join date : 2013-01-08 Location : Brantford
Hooray for updates! I finally figured out the Cromwell suspension! It has been keeping me from really getting things moving on this build. No pun intended.
When I got the kit, the swing arms didn't fit on the support braces, the supplied bolts were too big, and it didn't come with any way of securing the springs to the bolts. So, a little shopping around and a lot of shipping time later, I finally have the parts I need to finish this section. Here's how you do it:
Start by drilling out a hole large enough for the wheel mount. (Right hand side of the swing arm)
Next drill a smaller hole to fit the suspension bolt, which secures the suspension spring. I used a 2.5x20 bolt.
Next, put together the bolt and spring, securing it with a nut and some lock tight.
Next, glue/epoxy everything together. If you want a longer bolt, it can be drilled right through the swing arm, but I opted for the epoxy method...or the Ross method :-)
Do that 10X
Next, sandwich the suspension arms between the two side plates. I've also attached the support brackets, but I won't glue those down in case I have to make suspension repairs.
Here are some other angles showing the hidden suspension.
Now I need to secure the second suspension bolt, which attaches to the other end of the spring. Getting there....